The Allocation feature distributes data, specified at a summary level of a dimension, to lower levels. For example, actual sales revenue may be tracked daily, while sales revenue is forecast quarterly. Allocation is a useful way of distributing quarterly forecasts to the month and day levels.
You can select from the following allocation types:
With this type, allocation is typically based on values directly derived from a data source.
This type allocates a single, constant measure value to all descendant categories.
This type allocates values to descendant categories in proportion to a specific measure.
You can allocate measures to dimensions or levels that lack them in the following ways:
over entire dimensions, when the measure appears in a data source that does not reference the dimension
over levels in a dimension, when the measure is already specified at a level in that dimension
over categories in levels, when the measure is specified for the particular level
To allocate measures, you must
Have a model with two or more data sources.
Define the measures for that model.
Create the Dimension Map.
When you have completed the allocation process, you can check the relationships between dimensions and a measure by using the Show Scope command.
You cannot allocate a calculated measure. However, you can allocate a regular measure in proportion to a calculated measure.
To prevent the automatic rollup of constantly allocated measures, you must set a special variable so that the totals in your summary reports are the same as the constants specified for each individual member of a subset.
To do this on Windows, locate the cogtr.xml file in the installation_location/configuration directory, open it in any text editor, and add the following entry to the [PowerPlayDataServer] section: DISABLE_CONSTANT_ALLOCATION_ROLLUP=1.
If you are adjusting your model on UNIX or Linux, create an environment variable called PPDS_DISABLE_CONSTANT_ALLOCATION_ROLLUP and set its value to 1. In Bourne shell, add the line export PPDS_DISABLE_CONSTANT_ALLOCATION_ROLLUP.
Note: This change will affect other features and functions in your model or resulting reports, including calculated expressions, alternate or special drill-down paths, and custom subsets.
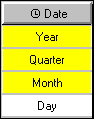
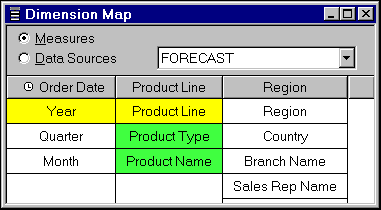
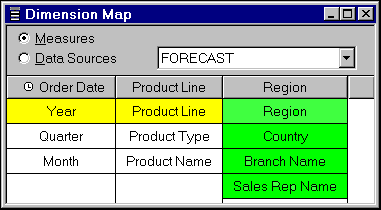
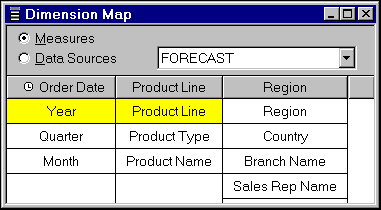
When you run the Show Scope command, you see a color-coded Dimension Map that highlights relationships between the measure and levels in a dimension. This scope map helps you identify where a measure is meaningful in models based on multiple data sources.
The scope of a measure depends on its relationship to the levels in the Dimension Map.
In this case, the dark yellow color indicates that the level takes its category values directly from the measure.
In this example, the levels Year, Quarter, and Month are directly associated with the measure, while the lowest level, Day, is associated with another measure.
In this case, the green color indicates that the level values are allocated either by a constant or proportionally to another measure.
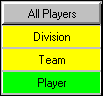
In this example, the dimension contains a level named Player, whose measure values are allocated proportionally to an ancestor level.
If a calculated measure is based on two regular measures, the measure scope dimension map shows the lowest common level. If the lowest common level is allocated, the level appears with the same shading (green) for both the allocated measure and the calculated measure.
In the Measures list, select the measure whose scope you want to see.
From the Edit menu, click Show Scope.
Tip: You can change the default colors of the scope map on the Dimension Map tab in the Preferences property sheet on the File menu. Click the color swatch you want to change and select a new color from the Color palette. Click OK twice.
Transformer automatically allocates a measure as a constant throughout an entire dimension when the source of the measure does not reference that dimension.
However, you can change this default allocation to Do Not Allocate or By Measure (proportionally allocate, based on values in another measure).
Open the property sheet for a dimension that is not referenced by the measure you want to allocate and click the Allocation tab.
Right-click the Allocation type for the measure and select an option.
Tip: You may also allocate measures to an entire dimension from the Categories diagram by double-clicking the Root category.
When a measure applies to only some levels in a regular or time dimension, you can allocate the measure from a level where it applies to all lower levels that have no relationship established.
When you allocate a measure from a level, all categories in the level inherit the allocation type. However, you can change the allocation type of individual categories.
In the Dimension Map, double-click the parent level of the levels to which you want to allocate measure values, to open its property sheet.
Click the Allocation tab.
A list of measures that are candidates for allocation appears.
In the Measure list box, right-click the Allocation type for the measure, and select an option.
The allocation types include Do Not Allocate, Constant, and By Measure.
Tip: You can check the relationships between dimensions and a measure by using the Show Scope command on the Edit menu.
You want to allocate sales forecasts, which are created at the Product Line level, to Product Type and Product Name levels, in proportion to actual revenues. The revenues are recorded daily, by product and region.
Using the Level property sheet for Product Line (the parent level), you set the Allocation type for theRevenue measure to By Measure.
You check the scope map to confirm your result.
You decide to allocate your annual sales forecasts on a monthly basis, in proportion to actual revenues.
Using the Level property sheet for Year, the parent level of Quarter and Month, set the Allocation type for the Revenue measure to By Measure.
You check the scope map to confirm your result.
When you change the allocation type for a level, the new allocation type is applied from the categories in that level to all descendant categories. You can also set the allocation type for an individual category.
For example, suppose that some operating costs associated with your product lines are based on sales channel factors, such as direct sales and catalog orders. Others are based on revenue. You want to allocate costs for each product line proportionally to each cost factor. Using the Category property sheet, you set the allocation type individually for each product line category.
Open the Categories diagram, and then open the property sheet for the category for which you want to set the allocation type.
Click the Allocation tab.
A list of measures that are candidates for allocation appears.
In the Measure list box, right-click the Allocation type for the measure and select an option.
The allocation types include From Level, Do Not Allocate, Constant, and By Measure.
Although allocation is automatic, you can disable it if it is not appropriate for your situation. For example, if the measure has no relationship to a dimension, you do not want it to be allocated as a constant throughout (the default behavior). Similarly, there may be cases where you do not want categories in the next lower level to inherit the allocation type from the higher level.
When you disable allocation, Transformer creates data points with missing values, which appear as zeros in your OLAP reports. You can change this default display to na instead.
For example, suppose you track sales revenue each day, for both products and regions, but your sales forecasts are done annually, by product line. By default, Transformer allocates forecast values as a constant throughout the entire Region dimension.
However, you do not want the forecast sales appearing in that dimension, as they will not be apportioned equally throughout your regions. On the Dimension property sheet, you disable allocation.
You check the scope map to confirm your result.
Open the Dimension, Level, or Category property sheet for which you want to suppress default allocation.
On the Allocation tab, right-click the Allocation type and select Do Not Allocate.
