. You
can also view all the conditional styles used in your report to
delete or modify them .
. You
can also view all the conditional styles used in your report to
delete or modify them .Add conditional styles to your report to better identify exceptional or unexpected results. A conditional style is a format, such as cell shading or font color, that is applied to objects if a specified condition is true.
For example, you want to automatically highlight in green the departments in your organization that meet their budget quotas and highlight in red the departments that go over budget. Creating conditional styles color-codes information in your reports so that you can find areas that need attention.
You can apply multiple conditional styles to objects. For example, you can apply one style in specific cells and another style for the overall report. If multiple styles set the same property, such as font color, the last style in the list is applied.
You can apply conditional styles to crosstab cells based on an adjacent value in the crosstab.
You can create a conditional style once and reuse it on multiple objects in your report. You can specify the order in which conditional styles are applied. You can also use existing local classes as your conditional styles.
You can create the following types of conditional styles.
| Type | Description |
Numeric Range | Highlights straight numerical data, such as revenues and losses. |
Date/Time Range | Highlights data from specific dates and times. |
Date Range | Highlights data from specific dates. |
Time Range | Highlights data from specific times. |
Interval | Highlights data falling between set intervals. |
String | Highlights specific alphanumeric items in a report. For example, you can highlight all instances of a specific word or phrase, such as Equipment. String criteria are case-sensitive. If multiple string conditions are met, only the first conditional style is applied. |
Advanced | Creates conditional styles that use calculations or expressions. If multiple advanced conditions are met, only the first conditional style is applied. |
You can perform a search to find
objects in your report that use conditional styles . You
can also view all the conditional styles used in your report to
delete or modify them .
You can also use variables to highlight data .
If a report contains both conditional styles and style variables,
the style variables are applied first and then the conditional styles
are applied.
Tip: The Return Quantity by Order Method sample report in the GO Data Warehouse (analysis) package
includes conditional highlighting. For more information about The
Great Outdoors Company samples, see Sample Reports and Packages.
Click the object for which you want to define a conditional
style and click the conditional styles button  .
.
Tip: You can also right-click the object and click Style, Conditional Styles or click the object, and then, in the Properties pane, set the Conditional Styles property.
Click the add button  and click New
Conditional Style.
and click New
Conditional Style.
Select the data item to determine the condition and click OK.
Depending on the type of data item you select, Report Studio selects the type of conditional style that you can use.
In the Name box, type a name for the conditional style.
To define a numeric value, date/time, date, time, or interval condition:
Click the new button and select a value to define a threshold.
The value appears in the Range column, and two ranges are created.
For each range, under Style, click one
of the predefined styles to apply to the range or click the edit
style button  and create a new style.
Tip: You can also define a style for the cells in your report that have missing values.
Repeat the steps above to add other conditions.
Tip: Under Style,
pause the pointer over each range  to see the
condition produced for that range.
to see the
condition produced for that range.
To move a value above or below a threshold, click the arrow
button  next to the value.
For example, you insert a threshold value of five million. By default, the ranges are less than or equal to five million and greater than file million. Moving the five million value above the threshold changes the ranges to less than five million and greater than or equal to five million.
To define a string condition:
Click the new button and select how to define the condition.
To select more than one individual value, click Select Multiple Values and click the values.
To type specific values, click Enter Values and type the values.
To specify your own criteria, such as values that begin with the letter A, click Enter String Criteria and specify the condition.
For each condition, under Style, click one of the predefined styles to apply or click the edit style button and create a new style. Specify the style to apply to remaining values by clicking one of the predefined styles beside Remaining values (including future values).
Specify the order in which to evaluate the conditions.
Conditions are evaluated from top to bottom, and the first condition that is met is applied.
To apply a conditional style to a crosstab cell based on an adjacent value in the crosstab:
Click the new button, select Variance, and click OK.
Name the new conditional style and click the add button.
Type a value to define a threshold.
The value appears under the Range column, and two ranges are created.
For each range, under Style, click one of the predefined styles to apply to the range or click the edit style button and create a new style.
Click the data item for which you want to define a conditional
style, and then click the conditional styles button .
Tip: You can also right-click the data item and click Style, Conditional Styles or click the data item, and then, in the Properties pane, set the Conditional Styles property.
Click the add button , click Use
Existing Conditional Style, and select the style.
Click the data item for which you want to define a conditional
style, and then click the conditional styles button .
Tip: You can also right-click the data item and click Style, Conditional Styles or click the data item, and then, in the Properties pane, set the Conditional Styles property.
Click the add button and click Advanced
Conditional Style.
Type a name for the conditional style.
Click the new button and
specify the expression that defines the condition.
For each condition, under Style, click
one of the predefined styles to apply or click the edit style button and
create a new style. Specify the style to apply to remaining values
by clicking one of the predefined styles beside Remaining
values (including future values).
Specify the order in which to evaluate the conditions by clicking a condition and then clicking the move up or move down arrow.
Conditions are evaluated from top to bottom, and the first condition that is met is applied.
You can view, modify, or delete the conditional styles that are applied to your report. You can also define a new conditional style.
In the Report Studio options, you can specify whether
to automatically delete conditional styles that are no longer used
in a report .
From the Tools menu, click Manage Conditional Styles.
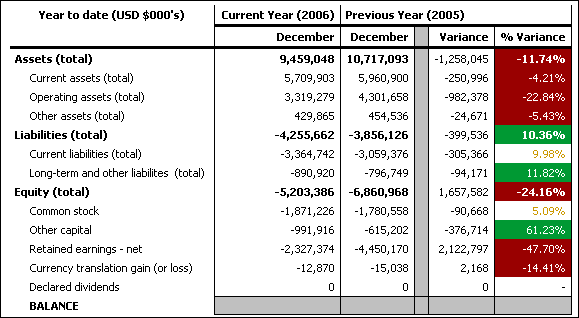
You are a report writer at The Great Outdoors Company, which sells sporting equipment. You have a report that compares current year data to previous year data and highlights negative percentage variances in red (Poor) and positive percentage variances in green (Excellent). You want to add a third conditional style to indicate percentage variances above 0 but less than 10. You create a conditional style that highlights percentage variances between 0 and 10% in yellow (Average).
Open the GO Balance Sheet as at Dec 31 2006 report from the GO Data Warehouse (analysis) package.
Right-click any cell in the % Variance column and click Style, Conditional Styles.
Select Conditional Style 1 and click
the edit button .
Select the first advanced condition listed and click the edit button.
Delete =0 from the expression definition.
Click the Functions tab, and then expand the Operators folder.
Double-click between, and then click after between in the expression, add a space, and type 0.
Double-click and, and then click after and in the expression, add a space, type .1, and click OK.
From the Style box associated with this condition, click Average.
Select the second advanced condition listed and click the edit button.
Replace >0 in the expression with >.1 and click OK.
Leave the style associated with this condition as is.
Run the report.
The new conditional style appears in the % Variance column.