 in
the GO Data Warehouse (analysis) package includes grouping. For
more information about The Great Outdoors Company samples, see Sample Reports and Packages.
in
the GO Data Warehouse (analysis) package includes grouping. For
more information about The Great Outdoors Company samples, see Sample Reports and Packages.Group data items in a list report to remove duplicate values. For example, you have a report that shows products purchased. For each product, the product type is also shown. You group the Product type column to show only one instance of each product type in the list.
Tip: The Succession Report sample report in
the GO Data Warehouse (analysis) package includes grouping. For
more information about The Great Outdoors Company samples, see Sample Reports and Packages.
You can also group data items in repeaters and in page sets .
In addition to grouping, you can specify the sort order of data items. In lists, you can sort data items within groups as well as ungrouped items. In crosstabs, you can sort row and column items. For more information, see Perform Advanced Layout Sorting.
When working with dimensional data sources, you cannot group two levels or hierarchies from different dimensions in the same list.
For example, a list contains the following levels:
Product Line
Region
Product Type
Country
Revenue
Product Line and Product Type are from one dimension and Region and Country are from another dimension. You group by the first three columns. You may encounter the following errors.
OP-ERR-0199: The query is not supported. The dimensions on the edge are inconsistent.
OP-ERR-0049. Unable to support a grouping that breaks the hierarchical order of the query items within it.
When working with dimensional data sources, you can group or sort only in the order of the existing hierarchy. If you change the order, the above error also occurs.
You can omit columns from the grouping. For example, if a level hierarchy contains the levels Country, State, and City, and another level hierarchy contains the level Product:
Country, State, City is valid.
Country, Product, and State is not valid because a level from another level hierarchy was inserted between two levels from another level hierarchy.
Country, City, and Product is valid even though State is omitted.
Country, Country code is valid where Country code is a member property of Country.
To override the hierarchical order that the data source specifies, you can override the dimension information of the query. For more information, see Add Dimension Information to a Query.
We recommend that you do not use member properties of a dimension to group data. Grouping by using member properties may give unexpected results, such as duplicates.
Click the column on which to group.
You can click either the column heading or one of the column cells.
Tip: To perform multiple groupings at once, use Ctrl+click or Shift+click.
From the Structure menu, click Group/Ungroup.
A symbol appears indicating that the column is grouped.
You can control when its values appear by setting
the group span, and the column appears in the list of headers
and footers that you can add to the report .
Note: Grouping all columns in a list is equivalent
to creating a single-edge crosstab .
You can perform more advanced groupings in a list to get the results you want. For example, you can
view the entire grouping structure and make changes to the grouping order
group a data item that appears in a query but not in the layout
specify a list of properties for a group
You can also perform advanced sorting .
Click a column in the list.
Click the select ancestor button  in the title
bar of the Properties pane and click List.
in the title
bar of the Properties pane and click List.
In the Properties pane, double-click the Grouping & Sorting property.
To change the grouping order, in the Groups pane, click the grouped item in the Groups folder and drag it to the grouping hierarchy.
To create a new grouping, in the Data Items pane, click the data item and drag it to the Groups folder in the Groups pane.
To specify a list of data items for a group, do the following:
Click the group.
Tip: Click Overall to specify a list of data items for the overall group. The overall group is the grouping of all data into one group. You can specify a list of data items for the overall group to add overall totals to the list.
Click the properties button  .
.
Select the appropriate check boxes.
When columns are grouped, you can choose how often to show column names by changing the group spanning. For example, when country and city are both grouped, you can choose to show the country name each time
the country changes, by spanning Country by Country
the city changes, by spanning Country by City
there is a new record, by specifying no spanning
Spanning one grouped column by another column is helpful if the second column contains many items.
Click the column that will span the other column(s).
In the Properties pane, set the Group Span property to the column to span.
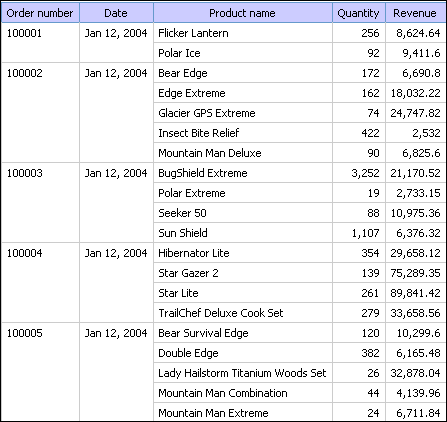
You are a report author at The Great Outdoors Company, which sells sporting equipment. You are requested to create a report that lists all product orders organized by order number. To make the report easy to read, you group the Order number column so that only one instance of each order number appears. However, because each order contains different products, the same order date appears for each product. You decide to show the order date only when the order number changes.
Open Report Studio with the GO Data Warehouse (query) package.
In the Welcome dialog box, click Create a new report or template.
In the New dialog box, click List and click OK.
In the Insertable Objects pane, on
the Source tab  , expand Sales
and Marketing (query) and Sales (query).
, expand Sales
and Marketing (query) and Sales (query).
Expand Sales order and add Order number by double-clicking it.
Expand Time dimension and add Date by double-clicking it.
Expand Product and add Product name by double-clicking it.
Expand Sales fact and add Quantity and Revenue by double-clicking them.
Group the Order number column.
Click the Date column.
In the Properties pane, set the Group Span property to Order number.
When you run the report, the first row of the Order date column appears for each Order number row.
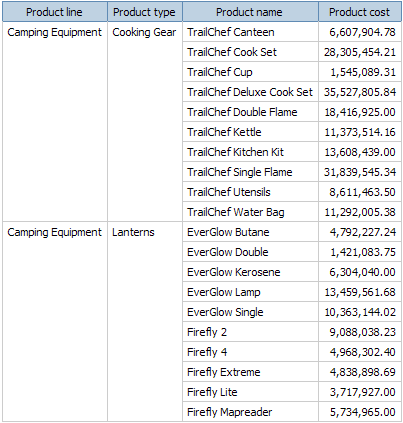
You are a report author at The Great Outdoors Company, which sells sporting equipment. You are requested to create a report that lists all products sold by the company, organized by the product line and product type. To make the report easier to read, you group the Product line and Product type columns so that only one instance of each column appears. However, because some product lines contain many different product types and products, you decide to show the product line for each product type.
Open Report Studio with the GO Data Warehouse (query) package.
In the Welcome dialog box, click Create a new report or template.
In the New dialog box, click List and click OK.
In the Insertable Objects pane, on
the Source tab , expand Sales
and Marketing (query).
Expand Sales (query) and Product and add the following data items by double-clicking them:
Expand Sales fact and add Product cost by double-clicking it.
Group the Product line and Product type columns.
Click the Product line column.
In the Properties pane, set the Group Span property to Product type.
Click any part of the list and then click the select ancestor
button in the title bar of the Properties pane.
Click List.
In the Properties pane, double-click the Font property.
In the Size box, click 8pt.
When you run the report, the product line appears whenever the product type changes.
Create sections in a report to show a data item as the heading of a section. When you run the report, separate sections appear for each value.
Creating sections is similar to creating headers by
grouping on a data item . The difference is that section headers appear
outside the list, crosstab, chart, or repeater. In addition, you
can group data items only in lists.
When working with dimensional data, you can also create page
layers to show values on a separate page for each member .
Click the column to make a section heading.
Do one of the following:
From the Structure menu,
click Section  .
.
If the column is in a list or repeater, this menu option will create sections without creating a master detail relationship. This can improve performance when running the report.
If the column is in a crosstab or chart, this menu option will create sections using a master detail relationship.
From the Structure menu, click Section Using Master/Detail.
This menu option creates sections using a master detail relationship.
Sections are created, and a section header appears. The data container that contains the column used to create sections is embedded in a list.
To add or remove section headers and footers, from the Structure menu, click Headers & Footers, click List Headers & Footers, and select or clear the appropriate check boxes.
The section header and footer check boxes appear under Overall header.
You can remove sections and reinsert the data item that was used to create the sections in the data container.
From the View menu, click Page Structure.
Expand the page containing the data container with the section.
Expand Page Body until you see the data container in which you added the section.
The data container is nested in the List Column Body object of the List object that is created when you add a section.
Drag the data container to Page Body.
The data container appears as a node of Page Body.
Delete the List object.
From the View menu, click Page Design.
In the Insertable Objects pane, click
the Data Items tab  .
.
Drag the data item that was used as a section header back into the data container.
If you created sections in a list without creating
a master detail relationship, click the data item, and then
click the group/ungroup button  to ungroup
the item.
to ungroup
the item.
For information about the page structure view, see The Page Structure View.
