 .
. You can import metadata into a new project or an existing project. Importing metadata is an operation that can be performed many times to extend the project. You can also export your model to a Common Warehouse Metamodel (CWM) Export Metadata.
Framework Manager can use the metadata and data from external data sources to build a project.
To import metadata, you must indicate which sources you want and where they are located. You can import from only one data source at a time. If you want to import from more than one data source, you must perform multiple imports.
If you want to add a project to a repository, you must set up the repository connection Creating Repository Connections.
You can import metadata from
relational databases, such as Oracle, DB2, and Microsoft SQL Server
For information about the supported data source types, access the IBM Cognos Resource Center (http://www.ibm.com/software/data/support/cognos_crc.html).
For information about working with data source connections, see .
When you import metadata, you can select how you want the import to handle duplicate object names. You have the option of not importing the object, or importing and creating a unique name. The advantage of importing everything except these duplicate objects is that you can add new database objects to the project without specifying them individually, and without going through synchronization Synchronize Projects. To import metadata that has the same table names, you must create two namespaces and import each table into a different namespace.
When you import SAP BW metadata, Framework Manager assigns a unique name to each object. Therefore, if you rename an object in the model and then reimport it, Framework Manager recognizes that it already exists. To reimport an object with a different unique name, you can create a new namespace and reimport the object into this namespace.
You can also import objects that have the same name .
When you import metadata from a relational database, you can import all the metadata or select particular object types such as tables, columns, views, synonyms, stored procedures, and functions. You can also import system objects from a relational source. System stored procedures are not supported. Framework Manager supports only user-defined stored procedures.
The following table shows the database objects that are mapped to Framework Manager objects.
Database object | Framework Manager object |
table | query subject |
column | query item |
view | query subject |
synonym | query subject |
procedure | query subject |
function | project function |
Named sets imported from Microsoft SQL Server and Microsoft Analysis Server stored as read-only calculations in the Framework Manager model. The calculation has a flag that identifies it as a named set, and a property that contains the dimension name.
Click the namespace, folder, or segment that you want to import into and, from the Actions menu, click Run Metadata Wizard.
From the Select Metadata Source dialog, you can choose the type of metadata you wish to import.
The Data Sources option provides a list of data sources defined in IBM Cognos 8.
Select the specific relational metadata source to import.
Select a data source connection and click Next.
If
the data source connection you want is not listed, you must first
create it .
Select the check boxes for the objects you want to import.
Specify how the import should handle duplicate object names. Choose either to import and create a unique name, or not to import. If you choose to create a unique name, the imported object appears with a number. For example, you see QuerySubject and QuerySubject1 in your project.
If you want to import system objects, select the Show System Objects check box, and then select the system objects that you want to import.
Specify the criteria to use to create relationships.
If you want to convert all cardinalities to 1, clear the Fact detection enabled check box. Removing n cardinalities disables fact detection and the ability to automatically prevent double-counting. For more information, see Modeling 1-n Relationships as 1-1 Relationships.
Click Import.
Import statistics including a list of objects that could not be imported and a count of objects that were imported are shown.
Click Finish.
After importing metadata, you must check the imported metadata for the following areas:
relationships and cardinality
determinants
the Usage property
for query items
the Regular Aggregate property
for query items
For more information about checking the metadata, see Verifying Imported Metadata.
You can import metadata from an existing IBM Cognos 8 model.
Note: If you import from another Framework Manager project, expression syntax is not adjusted for each language. For example, you create a Framework Manager project using French as the design language and you use French-specific syntax in calculations and filters. You then create a new project using English as the design language and you import the French project into the new project. Expressions defined in the calculations and filters are not valid. You must manually modify the expression after importing the metadata.
Click the namespace, folder, or segment you want to import into and, from the Actions menu, click Run Metadata Wizard.
Click IBM Cognos 8 Model and click Next.
Locate the IBM Cognos 8 model (.cpf file) that you want, click Open, and click Next.
Follow the instructions in the Import wizard:
Select the check boxes for the objects that you want to import.
Specify how the import should handle duplicate object names.
Choose either to import and create a unique name, or not to import. If you choose to create a unique name, the imported object appears with a number. For example, you see QuerySubject and QuerySubject1 in your project.
Click Next and click Finish.
To import metadata from an Architect model or an Impromptu catalog, you must first convert it to XML files. Because of differences between IBM Cognos Series 7 and IBM Cognos 8, after you import the migrated metadata in Framework Manager, additional work is required to test and refine the metadata.
For information about the migration of specific Series 7 objects, see the IBM Cognos 8 Migration and Upgrade User Guide on the IBM Cognos Resource Center (http://www.ibm.com/software/data/support/cognos_crc.html).
Ensure that you exported the Architect model or Impromptu catalog.
Click the namespace, folder, or segment you want to import into and, from the Actions menu, click Run Metadata Wizard.
Click either IBM Cognos Architect (.xml) or IBM Cognos Impromptu (.xml) and click Next.
Locate the Architect or Impromptu XML file that contains the metadata to import.
A message in the XML Preview window confirms that you chose a valid XML file.
Click Open.
Select the namespace containing your Series 7 security information.
Click Import.
A list of created objects appears.
If you want to verify the imported metadata, click the Verify after import check box.
Click Finish.
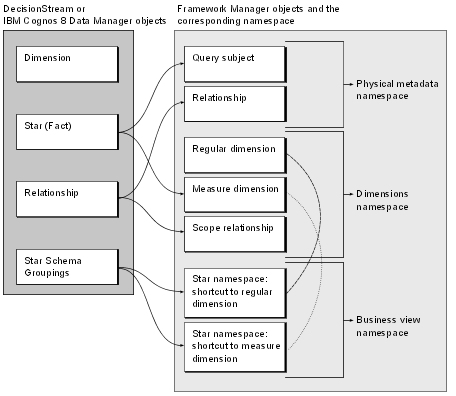
You can use Framework Manager to import metadata from an XML file created by IBM Cognos DecisionStream or IBM Cognos 8 Data Manager. You can import
a physical layer residing in the Physical Metadata namespace
This layer contains data source query subjects representing the imported tables. The physical layer contains query subjects and physical relationships between query subjects. These physical relationships are inferred from the relationships defined in the import file. Imported tables become Framework Manager query subjects, and surrogate keys become Framework Manager determinants.
a dimensional layer residing in the Dimensions namespace
This layer contains regular dimensions, measure dimensions, and scope relationships. The regular dimensions may be conformed or non-conformed. The measure dimension objects correspond to the imported stars. The scope relationships are inferred from the relationships defined in the import file.
a logical layer residing in the Business View namespace
This layer contains shortcuts to the regular and measure dimensions in the Dimension namespace. The shortcuts are organized as star schema groupings, which are namespaces with the same name as the stars from the import file.
The following diagram shows how objects from DecisionStream and Data Manager are mapped to Framework Manager objects.
A star maps to a Framework Manager query subject in the Physical Metadata namespace or as a measure dimension in the Dimensions namespace. The following fact attributes are included in the model.
Attribute name | Framework Manager mapping |
Table name | Name of the database query subject on which the model query representing the fact is based |
Short name | Query subject description |
Business name | Custom property |
Description | Query subject description |
Column name | Query item name |
Column type | Query item data type |
Column length | Query item size |
Column short name | Custom property |
Column business name | Custom property |
Column description | Query item description |
Column type | Query item usage |
Table keys | Determinants in the Physical Metadata namespace |
A connection maps to a Framework Manager data source.
Note: A data source connection is not automatically
created in Cognos Connection. You must manually create the connection
in Cognos Connection as explained in the import procedure steps .
The following data source attributes are included in the model.
Attribute name | Framework Manager mapping |
Connection short name | Custom property |
Connection business name | Data source name |
Connection description | Data source description |
Connectivity | type.interface property |
Connection string | Custom property |
A dimension build maps to Framework Manager as a top-level namespace.
A dimension containing hierarchies, levels, and columns maps to a Framework Manager regular dimension containing hierarchies, levels, and query items.
Conformed stars map to a Framework Manager namespace that resides in the Business View namespace. It contains shortcuts referencing the dimensions.
The following conformed star attributes are included in the model.
Attribute name | Framework Manager mapping |
Star short name | The name of the namespace representing the star |
Star business name | The name of the measure dimension representing the fact |
Star description | The description of the measure dimension representing the fact |
Facts | Shortcuts to a measure dimension |
Dimensions | Shortcuts to regular dimensions |
Hierarchies | Hierarchies in the regular dimension representing the DecisionStream dimensions |
The export file contains the following model properties.
Attribute name | Framework Manager mapping |
Schema version | Not mapped |
Catalog version | Custom property |
Model short name | The name of the namespace representing the top-level model object |
Model business name | Custom property |
Model description | The description of the namespace representing the top-level model object |
Click the namespace, folder, or segment that you want to import into and, from the Actions menu, click Run Metadata Wizard.
Click IBM Cognos DecisionStream (.xml) or IBM Cognos 8 Data Manager (.xml) and click Next.
Locate the XML file that contains the metadata to import.
A message in the XML Preview window confirms that you chose a valid XML file.
Click Open and then click Import.
A list of created objects appears.
If you want to verify the imported metadata, click the Verify after import check box.
Click Finish.
Create the data source connection in Cognos Connection. The name you define in Cognos Connection must be the same as the data source name shown in the Data Sources folder in Framework Manager.
For information about how to create a data source connection,
see .
You can use Framework Manager to import metadata from IBM data sources such as IBM WebSphere DataStage. Similar to third party data sources, metadata is extracted using the Meta Integration® Model Bridge (MIMB). For more information, see Import Metadata From Third Party Metadata Sources.
The options that you see are based on the selected data source. Not all options apply to Framework Manager.
The Framework Manager options available are the same regardless of the type of metadata source that you select. This table shows the options used to create objects in Framework Manager.
Framework Manager options | Description |
Logical/Physical representation | Specifies how logical and physical objects are represented. Integrated represents the logical and physical objects as one integrated object. Separated represents the logical and physical objects as two related objects. This is the default. Separated (verbose) represents the logical and physical objects as two distinct objects. |
Dimensional/Logical representation | Integrated represents the dimensional object as one integrated object. This is the default. Separated represents the dimensional object as one dimensional and one logical object. |
Diagram representation | Specifies how diagrams are represented in the project. As Namespaces indicates that diagrams are represented as namespaces. As Packages indicates that diagrams are represented as packages. Both indicates that diagrams are represented as both namespaces and packages. This is the default. None indicates that diagrams are not represented in the project. |
Namespace hierarchy | Specifies where the hierarchy of packages is kept. All indicates the hierarchy of packages is kept in all the namespaces. This is the default. None indicates that the hierarchy of packages is not retained. Dimensional level only indicates the hierarchy of packages is kept in the dimensional namespace only Logical level only indicates the hierarchy of packages is kept in the logical namespace only. Physical level only indicates the hierarchy of packages is kept in the physical namespace only. |
Logical only classes | Specifies whether the logical only classes are represented. Ignore indicates that logical only classes are ignored. Show indicates that logical only classes are shown along with all their attributes. This is the default. |
Logical only attributes | Specify whether the logical only attributes are represented. This option does not affect logical only attributes in a logical only class. See the Logical Only Classes option.) Drop indicates that logical information of a class is not shown if it contains a logical only attribute. Ignore indicates logical only attributes are ignored. Show indicates that logical only attributes are shown. This is the default. |
Unreferenced dimension attributes | Specifies how unreferenced dimension attributes are represented in the project. An unreferenced dimension attribute is one that does not participate in a level and is not referenced by any other dimension attribute. Ignore All indicates that all unreferenced dimension attributes are ignored. Ignore Join indicates that only unreferenced dimension attributes partitipating in a join are ignored. Show All indicates that all unreferenced dimension attributes are shown. This is the default. Show Join indicates that only unreferenced dimension attributes partitipating in a join are shown |
Dimensions without dimensional information | Specifies how to represent dimensions that do not contain any dimensional information. Dimension creates a dimension and a default hierarchy and level. This is the default. Model Query creates a modelQuery. |
Create cubes | Specifies whether the import can create cubes. A cube is represented as a namespace containing all the information necessary to build the cube. |
Populate screentip | Specifies whether the import uses the description field as a screenTip. True allows the content of the description field to be seen as a screentip in IBM Cognos Query Studio or IBM Cognos Report Studio. |
Name of the namespace containing the dimensional information | Specifies the namespace that contains the dimensional information. The default is "Dimensional Model". |
Name of the namespace containing the logical information | Specifies the namespace that contains the logical information. The default is "Logical Model". |
Name of the namespace containing the physical information | Specifies the namespace that contains the physical information. The default is "Physical Model". |
Name of the namespace containing the subject areas | Specifies the namespace that contains the subject areas. The default is "Subject Area". |
Consistency Check | Specifies the consistency check level. Basic is the recommended consistency check level. Extensive performs a more thorough validation of the model. None indicates that no validation is performed. |
You can use Framework Manager to import metadata from other sources, including relational. Metadata is imported using a metadata bridge.
You can import both relational and other metadata into the same model. We recommend that you start with a new Framework Manager model and import the other metadata before the relational metadata. This avoids conflicts if you import objects that have the same name.
When you import other metadata, data sources are created based on information provided through the import wizard. If at least one physical object in the other source references a database schema or catalog or both, one Framework Manager data source is created with its catalog or schema properties set to the names of the catalog or schema defined in the metadata. A generic data source is created for those physical objects that do not reference a catalog or schema.
If you want to access metadata from another data source, you must perform a physical model import.
Not all data sources contain metadata that is appropriate for business intelligence reporting and not all concepts map to Framework Manager. The metadata import is tailored to Framework Manager and only compatible metadata will be imported.
All metadata bridges deliver a physical layer that provides the basis for further modeling. The richness of the resulting Framework Manager model is directly related to the richness of the metadata source.
Other metadata sources can be based on multiple databases. The best way to import these multiple data sources into Framework Manager is to perform multiple imports. For each import, you select the items that correspond to that specific data source.
For example, the first time that you import from another metadata source, you select datasource1 and all the items that correspond to that data source. The next time, you select datasource2 and the items that correspond to that data source. You continue to import until you have imported all the data sources and their corresponding items.
Metadata is extracted from the third party data sources by the Meta Integration® Model Bridge (MIMB). Not all options apply to Framework Manager. For information about supported tools and object mappings, see the Meta Integration Web site.
The options that you see during import are based on the selected data source.
The Framework Manager options available are the same regardless of the type of metadata source that you select. This table shows the options used to create objects in Framework Manager.
Framework Manager options | Description |
Logical/Physical representation | Specifies how logical and physical objects are represented. Integrated represents the logical and physical objects as one integrated object. Separated represents the logical and physical objects as two related objects. This is the default. Separated (verbose) represents the logical and physical objects as two distinct objects. |
Dimensional/Logical representation | Integrated represents the dimensional object as one integrated object. This is the default. Separated represents the dimensional object as one dimensional and one logical object. |
Diagram representation | Specifies how diagrams are represented in the project. As Namespaces indicates that diagrams are represented as namespaces. As Packages indicates that diagrams are represented as packages. Both indicates that diagrams are represented as both namespaces and packages. This is the default. None indicates that diagrams are not represented in the project. |
Namespace hierarchy | Specifies where the hierarchy of packages is kept. All indicates the hierarchy of packages is kept in all the namespaces. This is the default. None indicates that the hierarchy of packages is not retained. Dimensional level only indicates the hierarchy of packages is kept in the dimensional namespace only Logical level only indicates the hierarchy of packages is kept in the logical namespace only. Physical level only indicates the hierarchy of packages is kept in the physical namespace only. |
Logical only classes | Specifies whether the logical only classes are represented. Ignore indicates that logical only classes are ignored. Show indicates that logical only classes are shown along with all their attributes. This is the default. |
Logical only attributes | Specify whether the logical only attributes are represented. This option does not affect logical only attributes in a logical only class. See the Logical Only Classes option.) Drop indicates that logical information of a class is not shown if it contains a logical only attribute. Ignore indicates logical only attributes are ignored. Show indicates that logical only attributes are shown. This is the default. |
Unreferenced dimension attributes | Specifies how unreferenced dimension attributes are represented in the project. An unreferenced dimension attribute is one that does not participate in a level and is not referenced by any other dimension attribute. Ignore All indicates that all unreferenced dimension attributes are ignored. Ignore Join indicates that only unreferenced dimension attributes partitipating in a join are ignored. Show All indicates that all unreferenced dimension attributes are shown. This is the default. Show Join indicates that only unreferenced dimension attributes partitipating in a join are shown |
Dimensions without dimensional information | Specifies how to represent dimensions that do not contain any dimensional information. Dimension creates a dimension and a default hierarchy and level. This is the default. Model Query creates a modelQuery. |
Create cubes | Specifies whether the import can create cubes. A cube is represented as a namespace containing all the information necessary to build the cube. |
Populate screentip | Specifies whether the import uses the description field as a screenTip. True allows the content of the description field to be seen as a screentip in IBM Cognos Query Studio or IBM Cognos Report Studio. |
Name of the namespace containing the dimensional information | Specifies the namespace that contains the dimensional information. The default is "Dimensional Model". |
Name of the namespace containing the logical information | Specifies the namespace that contains the logical information. The default is "Logical Model". |
Name of the namespace containing the physical information | Specifies the namespace that contains the physical information. The default is "Physical Model". |
Name of the namespace containing the subject areas | Specifies the namespace that contains the subject areas. The default is "Subject Area". |
Consistency Check | Specifies the consistency check level. Basic is the recommended consistency check level. Extensive performs a more thorough validation of the model. None indicates that no validation is performed. |
Before you can
import metadata, there must be a connection to the data source .
Click the namespace, folder, or segment you want to import into, and from the Actions menu, click Run Metadata Wizard.
Select Third Party Metadata Sources and click Next.
Click the metadata type to import.
In the Third Party Specific Import Options dialog box, use the File option to identify the file that contains the metadata to import.
Click the other options that you want. The options that you see are based on the selected data source.
Note: We recommend that you use the default options. These default options optimize the metadata import. If you change the options, you may see unexpected results. To revert back to the default options, click Use Defaults.
Click Next.
In the Framework Manager Specific Import Options dialog box, click the options that you want and click Next.
Follow the instructions in the Metadata Wizard:
Select a data source connection and click Next.
If
the data source connection you want is not listed, you must first
create it .
Select the check boxes for the objects you want to import.
Specify how the import should handle duplicate object names. Choose either to import and create a unique name, or not to import. If you choose to create a unique name, the imported object appears with a number. For example, you see QuerySubject and QuerySubject1 in your project.
Specify the criteria to use to create relationships and click Import.
For more information, see Relationships.
Import statistics including a list of objects that could not be imported and a count of objects that were imported are shown.
Click Finish.
The source metadata has a logical structure that is compatible with IBM Cognos 8. During the import, this structure is preserved for higher fidelity with the source model.
After the import, only the physical metadata is available.

analyze and review the model, see Analyze a Model
set the determinants
set the Usage property
Some bridges require facts to be set manually because this is not available from the metadata source.
verify the relationships and cardinality
resolve ambiguous relationships, such as multiple valid relationships, reflexive relationships, and recursive relationships
This section describes issues that you can encounter when working with metadata that you have imported into Framework Manager.
You cannot test a query subject that you have imported from another data source.
For example, you test a query subject and get this error message:
QE-DEF-0177 An error occurred while performing operation 'sqlPrepareWithOptions' status='-201'.
UDA-SQL-0196 The table or view "GOSALES1.COGNOS.COM.GOSALES.CONVERSION_RATE" was not found in the dictionary.
To resolve this problem, ensure that none of the following conditions exist:
The Framework Manager data source object created by the import, and referenced by the query subject, does not have an identically named corresponding data source in the IBM Cognos 8 Business Intelligence content store.
The corresponding content store data source exists but is not valid (the connection information is wrong).
The optional schema or catalog properties of the data source object that the import created and the query subject references are incorrect (for the databases accepting case-sensitive identifiers, ensure that the case is also correct).
The database object (table or view) represented by the query subject no longer exists in the database or it was renamed after the model was created, or it is otherwise not accessible within the current connection.
The Query Type is invalid. This can happen if you import a query subject from SAP BW and change the value of the Query Type property for the data source. By default the value of Query Type is multidimensional. Do not change it.
Primary key and foreign key relationships involving at least one table view are not imported from an Oracle Designer file into Framework Manager.
Create the primary key and foreign key relationships manually.
The views in Power Designer must be linked to the table that they reference. Otherwise the information is not saved in the Power Designer file and cannot be imported.
To resolve this problem, see the tooltip for the import bridge for Power Designer.
Support for expression parsing was improved in the MIMB in IBM Cognos 8. Functions that are equivalent between other metadata sources and IBM Cognos 8 are parsed. Exceptions to this include
functions with no mapping between IBM Cognos 8 and the other metadata source
For example, a Business Objects expression that is problematic is @select Country) LIKE ’C%’.
expressions that use a specialized syntax
For example, DB2 Cube Views use DB2CV references ($$1, $$2, and so on).
If you have functions with no mapping between IBM Cognos 8 and the other metadata source, after importing expressions from other metadata sources, edit these expressions manually in Framework Manager to conform to the equivalent Framework Manager syntax.
If you have expressions that use a specialized syntax, do the following:
In Framework Manager, identify all imported query items that represent embedded calculations using references such as $$1, $$2, and so on.
In the Properties pane, find the information provided in the patternMapping property for each query item.
The patternMapping property indicates the mapping between the parameters in the imported calculation and the actual object references in the original model.
Double-click a broken query subject.
Double-click the embedded calculation corresponding to the query item identified in step 1.
If the calculation was assigned a default name ("Calculation..."), replace it with the actual query item name.
Replace the imported parameters with the actual Framework Manager object references that these parameters represent.
Repeat these steps for each broken query subject.
You can import an XML file as a tabular data source in Framework Manager. You can import it locally or from a remote site through a valid URL. In Framework Manager the XML file is used to model metadata and create a package.
The XML file is validated and parsed at run time, when the query is processed by either Report Studio or Query Studio. If you add the VALIDATE=ON option to the connection string, Framework Manager partially validates the XML file in the <columnList> tag that describes the metadata. For information about supported data types, see XML Data Types.
You must use the xmldata.xsd schema to validate the XML file. The schema is located in the \c8\bin folder. It is not necessary to specify the location of the schema in the XML file itself.
To use XML as a data source, ensure that
you do not use Native SQL to access data in an XML file
you do not access Binary Large Objects (BLOB)
you use only sqlColumns() and sqlTables() metadata calls
Other calls return an unsupported function error.
the XML file is well-formed and valid
Before you import XML as a data source, there must be a connection
to the data source . If the XML data source is on another computer,
you must use an account that has permissions to access the data
source.
To use XML as a data source, you must understand XML, schemas, and other XML-related technology.
Before you can import metadata,
there must be a connection to the data source .
Click the namespace, folder, or segment that you want to import into, and from the Actions menu, click Run Metadata Wizard.
Click the XML data source that you want to import, and click Next.
Namespaces are containers like folders. Objects in a Framework Manager project must be uniquely identifiable. If you have two objects that have the same name, they must reside in two separate namespaces.
For example, you have a database that contains financial data. One set of tables represents Forecast and Actual information. Both the Forecast and Actual information have tables named Accounts Payable and Accounts Receivable. To import these tables into Framework Manager and use the same table names in the project, you must create two namespaces. You can name one namespace Forecast, and the other namespace Actual.
Click the model or root namespace and from the Actions menu and click Create, Namespace.
Right-click the namespace, click Rename, and type a descriptive name.
