Working with Relational Queries
Queries
specify what data appears in the report. In Report Studio, you create
and modify queries using Query Explorer  . Query Explorer provides an alternative way
to modify existing reports or to author new reports. You can use
Query Explorer to perform complex tasks and other tasks that are
more difficult to do in the report layout. For example, use Query
Explorer to
. Query Explorer provides an alternative way
to modify existing reports or to author new reports. You can use
Query Explorer to perform complex tasks and other tasks that are
more difficult to do in the report layout. For example, use Query
Explorer to
improve performance by changing the
order in which items are queried from the database, or by changing
query properties to allow the report server to execute queries concurrently
where possible
Note: By default, queries run sequentially.
Your administrator must enable the concurrent query execution feature.
For more information, see the Administration and Security
Guide.
view or add filters and parameters and modify their properties
view or add dimensions, levels, and facts
incorporate SQL statements that come from other reports or
reports that you write
create complex queries using set operations and joins
Specify a List of Data Items
for an Object
Specify the list of data items for an object when you
must reference a data item that is in a query but is not in the
layout. For example, you want to add a layout calculation to a list
that uses a data item that is in the query definition. If the data
item does not appear in the list, you must reference it in order
to make the layout calculation work.
You must also specify the list of data items if you
apply conditional formatting that uses a data item that is not in the
query.
Steps
Click a layout object.
Tip: For a list of layout objects for which you can
specify a list of properties, see the Properties property
in Report Studio Object and Property Reference.
In the Properties pane, double-click
the Properties property and select data items.
Relate a Query to a Layout
Queries and layouts work together. After you decide
the type of data that you need, you must create a layout in which
to show the results. Each column of data must be both selected for
the query and shown in a layout unless there are some columns that
you don't want to show. The query and layout portions of a report
must be linked to produce a valid report.
Report Studio automatically links query and layout. For example,
when you use Report Studio and the list report layout, query and
layout are automatically linked.
Steps to Manually Link a Query to a Data Container
Select a data container.
In the Properties pane, set the Query property
to a query.
In the Insertable Objects pane, on
the Data Items tab  ,
drag data items from the query to the data container.
,
drag data items from the query to the data container.
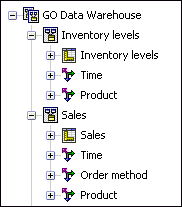
Connecting Queries Between Different Data Sources
IBM Cognos 8 supports the following:
RDBMS to RDBMS joins
set operations of any two queries
master detail relationships between any two queries
drill from any query to any other query
You cannot create the following types of joins:
Multiple-fact
Queries
You must understand the result of a query on more than
one fact table to achieve the results that you want. The result
of a multiple-fact query varies depending on whether you are working with
conformed or non-conformed dimensions, on the level of granularity,
and on the additive nature of the data.
The following data source has characteristics that affect the
results if you use a multiple-fact query with Inventory levels and
Sales. Granularity for time differs in that inventory levels are recorded
monthly and sales are recorded daily. Also, Sales includes a non-conformed dimension,
Order method.
The following examples will help you interpret the results of
a multiple-fact query and understand the options for changing a
query to obtain the results that you want.
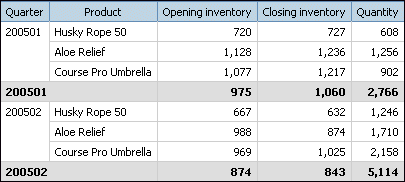
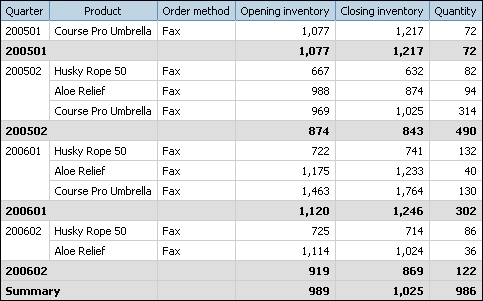
Conformed Dimensions
Individual queries on Inventory levels and Sales by Quarter and
Product yield the following results.
A query on multiple facts and conformed dimensions respects the
cardinality between each fact table and its dimensions and returns
all the rows from each fact table. The fact tables are matched on
their common keys, Product and Time.
Product and Time apply to both Inventory levels and Sales. However,
inventory levels are recorded monthly and sales are recorded daily.
In this example, results are automatically aggregated to the lowest
common level of granularity. Quantity, which comes from Sales, is rolled
up to months.
Nulls are often returned for this type of query because a combination
of dimensional elements in one fact table may not exist in the other.
For example, if Husky Rope 50 was available in inventory in 200501,
but there were no sales of this product in the same time period,
Quantity would show a null in the Husky Rope 50 row.
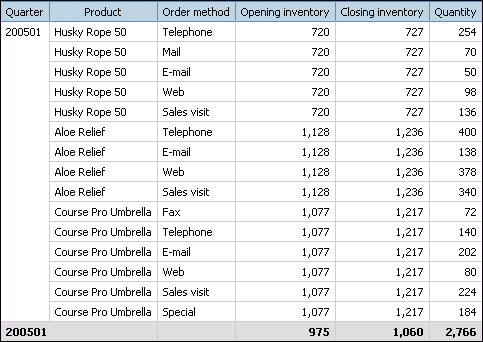
Non-conformed Dimensions
If a non-conformed dimension is added to the query, the nature
of the results returned by the query is changed.
Order Method exists only in Sales. Therefore, it is no longer
possible to aggregate records to a lowest common level of granularity
because one side of the query has dimensionality that is not common
to the other side of the query. Opening inventory and Closing inventory
results are repeated because it is no longer possible to relate
a single value from these columns to one value from Quantity.
Grouping on the Quarter key demonstrates that the result in this
example is based on the same data set as the query on conformed
dimensions. Summary values are the same. For example, the total
quantity for 200501 is 2,766 in both examples.
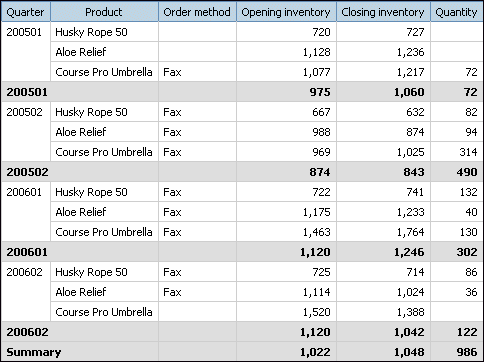
Filters on Non-conformed Dimensions
By default, to improve performance, filters are applied at the
database level. The default behavior can result in unexpected nulls
when you add a filter to a multiple-fact query. If you create a
filter on the Order method dimension to show only the fax order
method and apply the filter at the data source, the report includes
nulls.
The filter is applied only to one subject area, Sales. Because
Order method does not exist in Inventory levels, all products still
appear in the report. For example, Course Pro Umbrella was in inventory
in 200602. Because there were no sales using the fax order method
for this product in 200602, Order method and Quantity are null.
To remove the nulls, change the filter so that it is applied
to the result set instead of the data source. By applying the filter
to the result set, you get the same results that you would get if
you were working with conformed dimensions. Only the products that
were ordered using the fax order method appear in the report.
The summary for quantity is 986 using either filter method, which
shows that the results are based on the same data set.
In Report Studio, there are two types of
filters. A detail filter is applied to the data source. A summary
filter is applied to the result set. For more information about
how to apply detail and summary filters, see Create a Detail or Summary Filter.
Add
a Query to a Relational Report
You can create multiple queries in Query Explorer to
suit your particular needs. For example, you can create a separate
query for each data container in a report to show different data.
Tip: The Briefing Book sample report in the
GO Sales (analysis) package and the Top 10 Retailers for 2005 sample
report in the GO Data Warehouse (analysis) package include multiple queries.
For more information about The Great Outdoors Company samples, see Sample Reports and Packages.
Steps
Pause the pointer over the query explorer button  and
click Queries.
and
click Queries.
In the Insertable Objects pane, drag
one of the following objects to the work area.
In the Properties pane, set the object
properties.
For example, if you added a join,
set the Join Relationships property to define
the join.
Double-click a query.
In the Insertable Objects pane, on
the Source tab  , drag data
items to the Data Items pane.
, drag data
items to the Data Items pane.
Tip: You
can add data items to the query that you do not want to appear in
the layout. For example, to filter on Product line code and show
Product line in the layout, you must add both data items to the
query.
To create a new data item, in the Insertable
Objects pane, on the Toolbox tab  ,
drag Data Item to the Data Item pane.
,
drag Data Item to the Data Item pane.
To add a filter, in the Insertable Objects pane,
on the Toolbox tab, drag Filter to the Detail
Filters or Summary Filters pane
and define the filter expression .
Tip: You can also create a filter by dragging a data
item from the Source tab to one of the filters
panes and completing the filter expression. If you are working with
a dimensional data source, you can quickly filter data by dragging
a member to a filter pane instead of dragging the level to which
the member belongs. For example, dragging the member 2006 from the
Years level will filter data for the year 2006. This method is quicker
than dragging the Years level and specifying data only for the year
2006 in the filter expression.
When adding queries to the report
right-click the work area and click Show
Package Sources to see the queries that use data items
from a package
right-click the work area and click Expand References to
see the relationships that exist between queries in the report,
which is useful when you are creating complex queries
Create
a Union Query
Create a union query to combine two or more queries
into one result set.
You can combine queries that use different data sources. For
example, you can combine a query that returns data from a dimensional
data source with a query that returns data from a relational data
source.
To combine two queries, the following conditions must
be met:
The two queries must have the same number
of data items.
The data items must have compatible types and appear in the
same order.
For numeric data types, integer, float, double, and
decimal are compatible.
For string data types, char, varChar,
and longVarChar are compatible.
For binary data types, binary
and varBinary are compatible.
Date data types must match exactly.
Steps
Pause the pointer over the query explorer button and
click Queries.
In the Insertable Objects pane, do
the following:
Drag Query to the
work area.
Drag Union, Intersect,
or Except to the right of the query.
Two
drop zones appear to the right of the operator.
Drag a Query object to each drop zone.
Two queries are created in the work area, and a shortcut to each
query appears in the drop zones.
Double-click each query that makes up the union query and add
data items to the query.
Return to the Queries work area.
Click the set operator that you added in step 2.
In the Properties pane, set the Duplicates property
to remove or preserve duplicate rows.
Double-click the Projection List property.
The projection list shows the list of projected data items for
the set operation.
To automatically produce the list of projected data items,
click Automatically generated.
Report Studio generates the projection list using only one of
the two queries in the union.
To add, delete, move, or rename data items in the projection
list, click Manual and make the changes.
Double-click the union query.
In the Insertable Objects pane, on
the Source tab , drag data
items to the Data Items pane.
The union query is complete. You can now link the
union query to a data container in the layout.
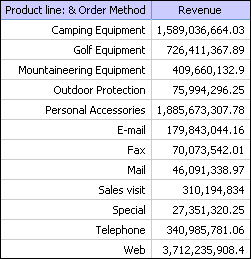
Example - Create a Two-column List Report for
Three Data Items
You are a report author at The Great Outdoors Company,
which sells sporting equipment. You are requested to create a list
report that shows revenue for all product lines and order methods. However,
you want the product lines and order methods to appear in a single
column. To create this report, you use a union query to join the
Product line and Order method data items.
Steps to Create a Report
Open Report Studio with the GO Data Warehouse
(query) package.
In the Welcome dialog box, click Create
a new report or template.
In the New dialog box, click Blank.
Pause the pointer over the query explorer button and
click Queries.
In the Insertable Objects pane, do
the following:
Drag Query to the
work area.
Drag Union to the right of the query.
Two
drop zones appear to the right of the operator.
Drag a Query object to each drop zone.
Query2 and Query3 are
created in the work area, and a shortcut to each query appears in
the drop zones.
Steps to Define the Queries
Double-click Query2.
In the Insertable Objects pane, on
the Source tab , drag the
following data items to the Data Items pane:
from the Product folder,
drag Product line
from the Sales fact folder, drag Revenue
In the Insertable Objects pane, on
the Toolbox tab , drag Data
Item to the Data Items pane.
The data item will be used to sort product lines and order methods
in the report.
In the Expression Definition box,
type 'A' and click OK.
In the Properties pane, set the Name property
to
Sort key
On the toolbar, press the back button  to
return to the Queries work area.
to
return to the Queries work area.
Double-click Query3.
In the Insertable Objects pane, on
the Source tab, drag the following data items
to the Data Items pane:
from the Order method folder,
drag Order method
from the Sales fact folder, drag Revenue
Repeat steps 3 to 5 to create a Sort key data item in Query3
with 'B' as its definition.
Steps to Define the Operator
On the toolbar, press the back button to
return to the Queries work area.
Click the Union operator.
Double-click the Projection List property.
The Product line item in the projection
list contains both product lines and order methods.
Click Manual.
Click Product line, and then click
the edit button  .
.
In the Edit box, type the following
after Product line:
& Order method
Click OK twice.
Steps to Define the List Properties
Double-click Query1.
In the Insertable Objects pane, on
the Source tab, drag the following data items
to the Data Items pane:
- Product line & Order method
- Revenue
- Sort key
Select the Sort key data item and,
in the Properties pane, set the Pre-Sort property
to Sort ascending.
When you run the report, all product lines will appear first
followed by all order methods.
Pause the pointer over the page explorer button  and
click Page1.
and
click Page1.
In the Insertable Objects pane, on
the Toolbox tab, drag List to
the work area.
Click the list.
Click the select ancestor button  in the title
bar of the Properties pane and click List.
in the title
bar of the Properties pane and click List.
In the Properties pane, set the Query property
to Query1.
The list is linked to the union query.
Double-click the Properties property.
Select the Sort key check box and
click OK.
Since the Sort key data item does not appear in the list, you
must make it a property of the list before it can sort product lines
and order methods.
In the Insertable Objects pane, on
the Data Items tab ,
drag the following items from Query1 to the list:
- Product line & Order method
- Revenue
Run the report.
A list report with two columns is produced. All product
lines and order methods appear in the first column.
Create a Join Relationship
You can create a join relationship to join two queries.
In general, join relationships should be created
in the Framework Manager model. Create a join relationship in Report
Studio if what you are trying to do cannot be modeled in Framework Manager.
Steps
Pause the pointer over the query explorer button and
click Queries.
In the Insertable Objects pane, do
the following:
Drag Query to the
work area.
Drag Join to the right of the query.
Two
drop zones appear to the right of the operator.
Drag a Query object to each drop zone.
Two
queries are created in the work area, and a shortcut to each query
appears in the drop zones.
Double-click each query that makes up the join query and add
data items to the query.
On the toolbar, press the back button to
return to the Queries work area.
Click Join.
In the Properties pane, double-click
the Join Relationships property.
Click New Link.
To create the link, click a data item in the left query,
and then click a data item in the right query.
For each query, click Cardinality and
click a cardinality option.
Click Operator and click an operator.
To convert the join relationship to an expression, click Convert
to expression.
Convert the join relationship to an expression to make changes
to the join definition.
Note: After you convert the relationship to an expression,
you cannot change it back to a relationship.
Double-click the join query.
In the Insertable Objects pane, on
the Source tab , drag data
items to the Data Items pane.
The join query is complete. You can now link the
join query to a data container in the layout.
Reference
a Package Item in a Child Query
When you create a child query in Report Studio, you
can only reference items from its parent or from other queries.
For example, if you add a filter to a child query, the only items
that you can insert into the expression are items that exist in
other queries defined in the report. To add an item from the package,
you must unlink the child query from its parent.
Steps
Pause the pointer over the query explorer button and
click Queries.
Unlink the child query from its parent by selecting the
parent query shortcut to the right of the child query and clicking
the delete button  .
.
Double-click the child query.
Package items are now available on the Source tab of
the Insertable Objects pane.
Add package items.
For example, to create a detail filter that references a package
item, drag the filter object from the Toolbox tab
to the Detail Filters pane, and then add the
items in the Expression Definition box.
Click the up arrow button in the toolbar to return to the
queries work area.
Recreate the link between the child query and the parent
query by dragging the parent query to the right of the child query.
If necessary, double-click the child query to complete
it.
For example, if you created a filter, you may need to complete
the filter expression.
Create
a Master Detail Relationship
Create a
master detail relationship to deliver information that would otherwise
require two or more reports. For example, you can combine a list
with a chart. The list can contain product lines and the chart can
show details for each product line.
Master
detail relationships must appear in nested frames to produce the
correct results. You can create a master detail relationship in
two ways:
Use a parent frame for the master query
and a nested frame for the detail query.
Associate a report page with the master query and use a data
container, such as a list or crosstab, for the detail query.
You cannot display parent data in the child frame or child data
in the parent frame. Also, you cannot perform calculations across
master detail queries.
You can use a master detail relationship to show data from separate
data sources in a single report. However, the data sources must
be contained in the same package.
If you are working with an SAP BW data source,
you cannot use a data item from the master query that contains non-ASCII
values.
To create a
master detail relationship using queries that reference two different
dimensional data sources, you must first link
the members by aliasing the levels that contain the members.
Steps
To use a parent frame for the master query and a nested
frame for the detail query:
In the Insertable Objects pane,
on the Toolbox tab , drag a List, Repeater Table,
or Repeater to the report.
Add a second data container to the object you inserted.
You
can insert a list, crosstab, chart, repeater table, or repeater
into a list. You can add a list to a repeater table or repeater.
Add data items to both data containers.
To associate a report page with the master query and use
a data container for the detail query:
Click anywhere in the report page.
In the Properties pane, click the select
ancestor button and click Page.
Set the Query property.
In the Insertable Objects pane, on the Toolbox tab,
drag a data container to the report.
To link a data item in the master query to a parameter
in the detail query instead of to another data item, create the
parameter in the detail query.
Use parameters to filter values at a lower level in the detail
query.
Pause the pointer over the query explorer
button and click the detail query.
In the Insertable Objects pane, on the Toolbox tab,
drag the Filter object to the Detail
Filters box.
In the Expression Definition box, create
the parameter .
Pause the pointer over the page explorer button and
click the report page.
Click anywhere in the report page.
In the Properties pane, click the
select ancestor button and click Page.
Click the data container containing the details.
From the Data menu, click Master
Detail Relationships.
Click New Link.
In the Master box, click the data
item that will provide the primary information.
To link the master query to a data item, in the Detail box,
click the data item that will provide the detailed information.
To link the master query to a parameter, in the Parameters box,
click the parameter that will provide the detailed information.
Tip: To delete a link, select the link and press the
Delete key.
If your detail query object is a chart, you can disconnect
a chart title from the master query.
Click the chart title, and then, from the Data menu,
click Master Detail Relationships.
Clear the Use the master detail relationships from
the chart check box.
Tip: To
avoid seeing the same data item twice in the report, click the data
item in the data container driven by the detail query and click
the cut button. This removes the item from the report display but
keeps it in the query.
Master Detail or Burst
Reports with Charts or Crosstabs May Result in Denial of Service
When
running a master detail or burst report that includes a chart or crosstab,
disk space exhaustion may cause the report or other requests to
fail. A large set of burst keys or master rows may produce one or
more charts per detail, resulting in many master detail executions.
This may cause the temp folder to accumulate many gigabytes of temporary files
containing data required for successful chart rendering.
To avoid this issue, we recommend that you test large
master detail or burst reports that include charts or crosstabs
to determine the potential peak disk requirements for the report.
Working with Queries in SQL
For each query in a report, you can work with the SQL
that is executed when you run a report. You can
When working with a relational data source, the SQL that is produced
by Report Studio depends on the report
output selected.
Note: MDX is not available with relational or DMR data
sources.
View the SQL for an Entire
Report or a Query
View the SQL to see what is passed to the database when
you run a report.
Steps
To view the SQL for the entire report, from the Tools menu,
click Show Generated SQL/MDX.
This option shows the SQL that will be executed in the data source.
The SQL is organized by query and by query result. If a query is
used in more than one data container, a query result is generated
for each data container.
To view the SQL for a specific query, do the following:
Pause the pointer over the query explorer
button and click the query.
In the Properties pane, double-click
the Generated SQL/MDX property.
The Generated SQL/MDX property shows the
SQL that is executed when you view tabular data (from the Run menu,
click View Tabular Data). Tabular data shows
the data that is produced by the query in the form of a list. You
can use this property to help you build advanced queries.
The SQL for the query appears in the Generated
SQL/MDX dialog box. You can choose to view native SQL,
which is the SQL that is passed to the database when you execute
the query, or Cognos SQL, which is a generic form of SQL that Report
Studio uses. Cognos SQL is converted to native SQL before the query
is executed.
Build a Report Using Your
Own SQL
You can build a report by adding SQL from an external
source, such as another report.
If you edit the SQL of a query, you must change the Processing property
for that query to Limited Local.
Steps
From the File menu, click New.
Click Blank.
Pause the pointer over the query explorer button and
click Queries.
In the Insertable Objects pane, drag Query to
the work area.
In the Insertable Objects pane, to
build an SQL query, drag SQL to the right of
the query
Tip: You can drag SQL anywhere
in the work area, and Report Studio will automatically create a
query.
In the Properties pane, double-click
the Data Source property and click a data source.
If required, set the Catalog property
to the name of the catalog.
Double-click the SQL or MDX property
and type the SQL.
Click Validate to check for errors.
In the Properties pane, set the Processing property
to Limited Local.
Double-click the query.
If the SQL is valid, the data items defined in the SQL appear
in the Data Items pane.
Pause the pointer over the page explorer button and
click a report page.
In the Insertable Objects pane, on
the Toolbox tab, drag an object to the work area.
For example, drag a list, crosstab, chart, or repeater.
Click the data container.
In the Properties pane, click the
select ancestor button and click the container you just created.
For example, if you created a list, click List.
Set the Query property to the query
for the report type.
In the Insertable Objects pane, on
the Data Items tab ,
drag the items from the query you chose in the previous step to
the data container.
Convert a Query to SQL
You can convert a query to SQL to edit it. You may want
to do this to improve performance or to use SQL features that are
not supported directly by Report Studio.
Converting a query to SQL is an irreversible process.
Steps
Pause the pointer over the query explorer button and
click the query.
In the Properties pane, double-click
the Generated SQL property.
Click Convert.
Click Validate to check for errors.
In the Properties pane, set the Processing property
to Limited Local.
Edit the SQL
You can edit the SQL for a query that has been created
as an SQL query or that has been converted to SQL.
Steps
Pause the pointer over the query explorer button and
click the SQL item under the query.
Double-click the SQL item.
Make changes in the text box.
Click Validate to check for errors.
First-Rows Optimization
The SQL produced by Report Studio depends on the report
format you choose. For example, if you specify HTML format, first-rows
optimization is requested. All-rows is requested if you specify
PDF.
It is important for database administrators and programmers to
remember that Report Studio does not always use first-rows optimization.
If you assume first-rows optimization is always requested, this
can cause the RDBMS optimizer to process the query differently than
you expect.